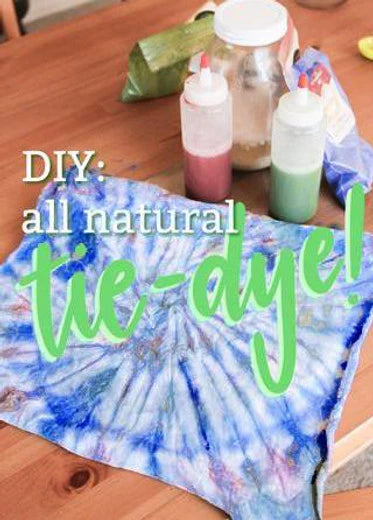
Tie dyeing is a classic way to add fun, colorful designs to towels, shirts, and different fabrics as a great Summertime craft.
But the conventional tie dye kits contain toxic, petroleum based dyes and chemicals that we'd like to avoid. Let's go back to our ancestral roots and use earth and plant-based ingredients to create the same beautiful results!
Supplies:
- 1/4 cup soybeans
- Water
- Mason Jar
- Blender
- Fabric for straining the mixture (sheer stockings fabric works great for this!)
- Earth & Mineral Pigments
- Reusable bottles
- Rubber bands
- Wide tupper ware or bowl
- Fabric (for dyeing!)

First, here's how to make the soy milk binder:
(Note: store-bought soy milk does not work as an effective binder!)
1. Add 1/4 cup of soybeans to a mason jar and enough water to completely submerge the soybeans. Let the soybeans sit in the jar overnight.

2. Pour the soybean mixture into a blender and add 3 cups of warm water.

3. Blend the mixture on high for 5 minutes.
4. Prepare your filter by wrapping the top of the mason jar with stockings fabric and securing with a rubber band.

5. Filter the blended soybean mixture through the fabric. You'll need to periodically scoop out the soybean pulp that collects in the filter.

6. Add some soymilk to a large container and dilute with four parts water. (The amount of soymilk used will depend on the size of the fabric you want to dye)

7. Place your fabric in the soymilk mixture. Make sure that EVERY part of the fabric absorbs the soymilk!

8. Hang the fabric outside to dry. In the meantime, begin making the dyes.
Making the dyes:
1. Add 1/2 tablespoon of Earth & Mineral Pigment to one of your reusable bottles. Add 3-4 tablespoons of filtered soymilk and then dilute with 4 parts water. Shake the bottle to ensure that the pigment is thoroughly mixed. (You can add more pigment for deeper colors)

2. When your fabric has dried, prepare your design. I prepared a spiral design by pinching the center of the fabric and twisting to form a cinnamon-roll like shape, then using three rubber bands to divide the fabric into 6 sections.


3. Begin to add your dye to the fabric in whatever pattern you choose. Make sure to get between the folds of the fabric as well.

4. Let the fabric sit with the dye overnight. Then remove the rubber bands, rinse off any excess dye, and hang to dry.

Ta-da! An all-natural tie dye!
Interested in more crafts featuring Natural Earth Paint products? Visit our Nature Crafts DIY page!
Follow us on Instagram, Facebook, and Pinterest for more natural inspiration.