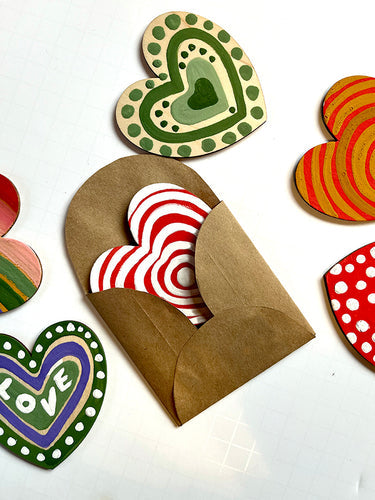
One of our favorite ideas for using the Natural Valentine's Craft Kit

Valentine's Day is the perfect time to show your love and creativity. Why not pair your custom wooden Valentine's with a cute, eco-friendly and hand-made envelope that reflects your style? With just a few simple materials, you can create beautiful, personalized envelopes that will make your wooden valentines extra special. Here’s how to make your own envelopes using upcycled paper shopping bags!

What You’ll Need:
- Natural Valentine's Craft Kit (includes wooden hearts and paint)
- Scissors
- Any paper - old shopping bag or envelope (for an up-cycled option)
- Craft glue
- A marker (for writing a personal message)
Instructions:

Step 1: Create Your Envelope Template
After finishing your custom wooden valentines and writing a heartfelt message on them, it’s time to make the envelope. Start by creating a template for the envelope. For a perfect fit to the wooden hearts, the flaps on three sides of the envelope should measure 1 3/4", and the top flap should be 2" as shown in the image above.
Step 2: Cut Out the Envelope Shape
Carefully use your scissors to cut along the solid lines of your template. You’ll now have the basic envelope shape that will hold your wooden Valentine securely.

Step 3: Make Folds Along the Dotted Lines
Next, fold the edges along the dotted lines of your template. These folds will help shape your envelope and allow the flaps to tuck in neatly when glued. Take your time to ensure the folds are crisp and even.

Step 4: Glue the Shorter Sides Together
Now it’s time to assemble the envelope! Use your craft glue to stick the three shorter sides together, leaving the top flap open. Be sure to apply glue carefully along the edges to avoid any mess.

Step 5: Customize Your Envelope
Once the envelope is glued together, it’s time to get creative! Use paint to decorate the envelope to your liking. You can paint hearts, write little love notes, or even add a fun design to match the theme of your wooden Valentine. This is where you can truly make the envelope your own.

Tips for Extra Personalization:
- Add a special touch by drawing little hearts, arrows, or writing "I Love You" on the envelope with your paint or marker.
- For an even more eco-friendly option, you could use recycled paper or fabric scraps to add texture to the envelope.
- Experiment with different paint colors or create a watercolor effect for a soft, romantic look.

Why You'll Love This Craft:
Not only is this a great way to personalize your Valentine's Day cards, but it’s also a fantastic eco-friendly craft! Repurposing a paper shopping bag gives your envelope a unique and rustic feel, while the wooden valentines add a natural touch. These envelopes are perfect for giving your loved ones a little something special that’s both beautiful and sustainable.
Happy crafting, and enjoy making your Cute Eco-Friendly Envelopes and Valentines!


